Tuesday, September 6, 2016
Google analytic report - Avg Session Duration (excel function )
Google analytic report that has been download into excel on Avg Session Duration somehow change into some amount that is different from Google Analytic online.
Here is the Excel Function that you need to put on the cells = x/86400
On the Format cells, you need to change into " custom " and choose "mm:ss"
Hope it help !
Monday, August 10, 2015
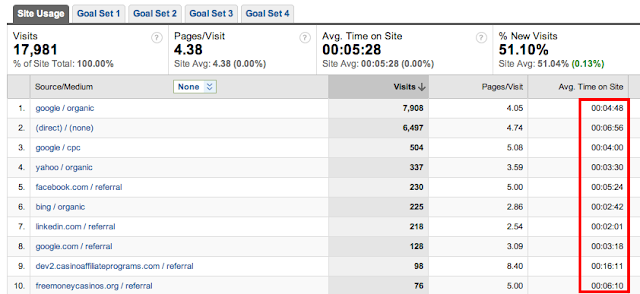
How to change "Average Time on Page" into as written on google analytics?
Google analytic report that has been download into excel on Avg
Session Duration somehow change into some amount that is different from
Google Analytic online.
Here is the Excel Function that you need to put on the cells = x/86400
On the Format cells, you need to change into " custom " and choose "mm:ss"
Here is on detail :
This is how to make it as it seen on google analytic:
- On the other empty column , click function , then type =A1/(60*60*24)

- Drag the number into row that need to be changed.
- Change "format cells" into custom, pick hh:mm:ss

Here is the Excel Function that you need to put on the cells = x/86400
On the Format cells, you need to change into " custom " and choose "mm:ss"
Here is on detail :

This is how to make it as it seen on google analytic:
- On the other empty column , click function , then type =A1/(60*60*24)

- Drag the number into row that need to be changed.
- Change "format cells" into custom, pick hh:mm:ss

Thursday, November 14, 2013
Youtube Channel Art
Youtube Top Banner
New channels will have a flexible width on desktop, meaning that the site will scale to reveal more content on larger browser windows. There is a minimum size at which point the site would no longer adapt and a scroll bar would appear in the browser window. At the minimum width the channel art is 1546 X 423 px (this is the “Safe area” given that text & logos will not be cut off). At the maximum width, the channel art is 2560 X 423 px. This means that the “SAFE AREA” (channel art at minimum width) will always be visible and the areas to the right and left (shown with green arrows) might be visible depending on the viewer’s browser sizehttps://support.google.com/youtube/answer/2972003?hl=en&topic=16630&ctx=topic
Sunday, March 10, 2013
Make a Android apps from your phone in easy way
Make a Android apps from your phone in easy way
Step 1 :
Setup the apps on your PC : Google App Inventor from http://beta.appinventor.mit.edu/learn/setup/Step 2 :
Design your apps on http://beta.appinventor.mit.edu making from your phoneStep 3:
Google Play Store and select automatic update.You can learn the tutorial in here http://appinventor.mit.edu/
Saturday, February 2, 2008
Instalasi Apache-Php-MySQL untuk Windows XP (PhpTriad 2)
Instalasi :
1. Instalasi Apache2
· Jalankan file apache_2.0.xx-win32-x86-no_ssl.msi. Untuk keseragaman, installkan Apache2 di folder C:\. Hasilnya adalah Apache2 akan diinstall di folder C:\Apache2, dengan file apache.exe ada di folder C:\Apache2\bin.
· Pilihlah untuk menjalankan Apache2 sebagai service, di port 80, sehingga secara otomatis setiap anda start-up Windows, Apache2 akan aktif.
· Setelah selesai instalasi, maka di system tray akan muncul ico Apache Service Monitor. Klik dua kali untuk melihat status apakah Apache sudah aktif.
· Buka browser, lalu akses http://localhost/. Bila muncul tampilan :
Berarti instalasi Apache sudah beres dan sudah berjalan sebagai service.
· Edit file C:\Apache2\conf\httpd.conf.
Tambahkan baris berikut di awal bagian LoadModule
LoadModule php4_module php/sapi/php4apache2.dll
AddType application/x-httpd-php .php
Cari bagian DirectoryIndex, lalu ubah menjadi :
DirectoryIndex index.html index.html.var index.php
Pastikan baris berikut sudah benar :
ServerRoot "C:/Apache2"
DocumentRoot "C:/Apache2/htdocs"
2. Instalasi PHP4
· Ekstrak file hasil download ke folder apache2, sehingga file php.exe berada di folder C:\Apache2\php
· Kopi file C:\Apache2\php\php4ts.dll ke folder C:\Apache2\bin
· Kopi file C:\Apache2\php\sapi\php4apache2.dll ke C:\Apache2\bin
· Kopi file C:\Apache2\php\php.ini-recommended ke folder C:\Apache2
· Namakan file C:\Apache2\php.ini-recommended menjadi C:\Apache2\php.ini
· Edit file C:\Apache2\php.ini. Sesuaikan dengan keterangan berikut :
.....
output_buffering = 4096
.....
zlib.output_compression = On
.....
extension_dir = "c:/Apache2/php/extensions"
· Oke, sekarang restart Apache untuk menguji apakah PHP sudah berjalan sebagai modul Apache. Ada dua cara untuk restart Apache :
a. Menggunakan Apache Service Monitor, klik dua kali ikon Apache Service Monitor di system tray, lalu klik tombol restart
b. Dari perintah konsol. Start menu à run à cmd. Anda masuk ke konsol Windows. Lalu ketikkan :
C:\path>net stop apache2
The Apache2 service is stopping...
The Apache2 service was stopped successfully.
C:\path>net start apache2
The Apache2 service is starting..
The Apache2 service was started successfully.
Untuk kedua cara di atas, bila tidak ada pesan error apa pun, berarti PHP sudah diinstall dengan baik sebagai modul Apache. Coba cek lagi Apache Service Monitor, di bagian bawahnya nanti akan muncul tulisan :
Apache/2.0.48 (Win32) PHP/4.3.4
3. Instalasi MySQL 4
· Ekstrak file .zip hasil download. Jalankan file setup.exe. Pilih folder C:\Apache2\mysql bila ditanyakan di mana anda ingin menginstall MySQL server.
· Jalankan C:\Apache2\mysql\bin\winmysqladmin.exe. Isikan username dan password untuk root user (user dengan akses tertinggi) sesuka hati anda. Di sini saya menggunakan username = root dan password = 1234.
Perhatian :
Password yang baru saja anda masukkan, akan disimpan dalam file my.ini dalam format plain text, dan tanpa enkripsi sama sekali. Bacalah manual MySQL mengenai mengganti password root langsung dari konsol mysql.
· Pilih menu my.ini Setup. Di sebelah kiri, di bagian mysqld file, pilihlah mysqld-max-nt. Lalu klik tombol Save Modification.
· Restart mysql, dengan cara :
a. Buka WinMySQLadmin, klik kanan di bagian atas, tepat di lambang lampu lalu lintas, pilih WinNT à Stop the Service. Tunggu sampai lampunya menjadi merah, klik kanan lagi, pilih WinNT à Start the Service. Bila lampu hijau, MySQL sudah restart dengan baik.
b. Dari konsol (Start menu à Run à cmd)
C:\path>net stop mysql
The MySql service is stopping.
The MySql service was stopped successfully.
C:\path>net start mysql
The MySql service is starting.
The MySql service was started successfully.
4. Pemeriksaan terakhir
· Buat file C:\Apache2\htdocs\phpinfo.php. Isikan dengan :
· Buka browser, akses http://localhost/phpinfo.php. Hasilnya :
Gambar di atas menunjukkan keterangan dasar tentang status PHP anda. Bisa dilihat operating system yang digunakan, nama web server, serta tanggal dari versi PHP, serta keterangan tentang modul-modul Zend yang terpasang.
Lebih lanjut lagi, bisa didapatkan keterangan tentang Apache2 :
Semua sudah beres, anda bisa lanjutkan menginstall phpMyAdmin.
5. Instalasi phpMyAdmin
· Ekstrak file hasil download ke : C:\Apache2\htdocs\phpmyadmin. Lalu buka file C:\Apache2\htdocs\phpmyadmin\config.inc.php.
· Isikan keterangan untuk koneksi ke database server MySQL. Contohnya :
$cfg['PmaAbsoluteUri'] = 'http://localhost/phpMyAdmin/';
.....
$cfg['Servers'][$i]['auth_type'] = 'config';
$cfg['Servers'][$i]['user'] = 'root';
$cfg['Servers'][$i]['password'] = '1234';
['auth_type'] = 'config' berarti phpMyAdmin akan menggunakan data user dan password yang diisikan di file config.inc.php. Bila diganti menjadi ‘http’, maka otorisasi user dan passwordnya akan langsung diakses dari database mysql di server MySQL. Untuk keamanan, sangat disarankan menggunakan [‘auth_type’] = ‘http’.
Perhatian :
Menyimpan password di dalam file, apalagi tanpa enkripsi, merupakan tindakan yang tidak disarankan, sebab memiliki resiko keamanan tinggi.
Jalankan phpMyAdmin dari browser : http://localhost/phpmyadmin
Installing a new web server: Apache2, PHP5, MySQL4 and PHPmyAdmin.
Install Apache
We use the installer so it will come easy, just go with the flow! But for "Install to a different folder", we will use/create: C:Program FilesApache Group this_will_be Apache2 (Created by extracting files) First test: Go to http://localhost/. It should show the default Apache index page in English. In case of problem: Go to Start > All Programs > Apache and try to stop and start or restart (The "Monitor Apache Servers" utility may also appear in your Windows Taskbar System Tray by the clock, etc.). Next edit the httpd.conf file using your favorite script editor. "C:Program filesApache groupApache2confhttpd.conf" Go to line 228, and change the docroot to: DocumentRoot "C:/Program Files/Apache Group/Apache2/htdocs" Go to line 253 and copy/paste the same dir as 228 but keep the " Directory " first part Save, and restart apache 2.
Install PHP5
Unzip the PHP zip to C:/PHP (Create the Dir PHP at C:/ root level)
Next: Shut down Apache; Crank up your favorite editor again and open the apache httpd.conf and add two lines of code:
LoadModule php5_module C:/php/php5apache2.dll AddType application/x-httpd-php .php
Added .php extension to show how to parse .php files
I have added those two to the very bottom of the httpd.conf file.
Verify that the path in the LoadModule directive points to the dir where PHP is installed.
Next, copy/paste "php.ini-dist" to C:/Program Files/Apache Group/Apache2, and rename it to php.ini.
In order to get a working WAMP we need to copy from C:/PHP root and from C:/PHP/ext some DLLs to Apache2 root (Where you did paste your renamed copy of php.ini) those are:
fdftk.dll fribidi.dll gds32.dll libeay32.dll libmash.dll libmysql.dll libmysqli.dll msql.dll ntwdblib.dll php5apache2.dll php5apache.dll php5apache_hooks.dll php5isapi.dll php5nsapi.dll php5ts.dll phpmsql.dll phpmssql.dll phpmysql.dll phpmysqli.dll ssleay32.dll yas.dll
We need to set the PHP path for Windows: Go to: Control Panel > System > Advanced tab Click on "Environment variables" Look in the "System variables" pane Find the "Path" entry Double click it and add at the end of the string your PHP dir You need to start with ";" without double quotes!
And follow by: C:php So it will look like: ";C:php" Again, without double quotes!
Now restart the Apache server. Test: Create a simple file such as php5_info.php
Save it in C:/Program Files/Apache Group/Apache2/htdocs/php5_info.php Open a browser and enter the following address http://localhost/php5_info.php it should display your complete PHP setting if it does not work properly you might have done something wrong with the multiple edits; check them out and give it another go.
Open up C:/Program Files/Apache Group/Apache2/php.ini. First, stop Apache On line 276, you may change:
error_reporting = E_ALL & ~E_NOTICE & ~E_STRICT to error_reporting = E_ALL
Which should be fine as a test server, remember this is a test server running under Windows as such it HAS NEVER BEEN INTENDED TO BE USED AS A PRODUCTION SERVER!
You may also change line 288: display_startup_errors = Off to display_startup_errors = On
On line 351, you may possibly uncomment ";arg_separator.output = "&"
On line 378... register_long_arrays = On to register_long_arrays = Off
After saving restart Apache. Run again your php5_info.php script and check that your changes are showing up as intended
Next: Let’s play with Extensions, there are a bunch of extensions that you will on your own explore however setting the SQL extension is a must!
Now, open your php.ini. On line 447 you should read: user_dir ="c:php" and below leave extension_dir = "./" as is.
Go to line 579 and uncomment:
extension=php_msql.dll extension=php_mysql.dll
Save and give it a try If it does not work try:
extension_dir = "C:PHPext"[fixed]
Save and try again! As I mentioned all the DLLs should be in PHP dir or in the [fixed]PHP/ext dir. If some are missing then unzip the PECL libraries zip file and pick your choices :)
Go to line 880 and enter
session.save_path = "C:Program FilesApache GroupApache2htdocstmp"
Do not forget to create the tmp dir.
From then you should have a working PHP
Install MySQL Easy enough you may extract it in any dir that fits you. And run the setup.exe Enjoy the show and follow the guide. (Chose to install at Apache Group root level)
Finished ...MySQL is installed
You may or may not configure the root user (remember this is your test bed not a production server) if you decide not to set a root user then do not use a password in your connection functions.
Create a shortcut to start MySQL: Go to Apache Group root and open the bin dir highlight mysqld.exe and create a shortcut – this will start MySQL, do the same with MySQLshutdown and drag those shortcuts to your desktop From then you may run a simple query test or wait and use the PHPmyAdmin as a final test
Install PHPmyAdmin
Extract the zip file to .... /apache group/apache2/htdocs
The PHPmyAdmin dir has a long name so we prefer renaming it as "pma" Then go to pma/config.inc.php
On line 39, type:
$cfg['PmaAbsoluteUri' ] = 'http://localhost/pma/';
Go to line 84 and enter your password (again only if you set one!)
Verify that MySQL and Apache are running and go to http://localhost/pma/index.php
That is it - You have installed the finest WAMP based on the most recent distribution and PHP5! Remember that all scripts used in your web dev test bed are loaded in the Apache2/htdocs directory.
--------------------------------------------
Download Apache 2 Windows Binary (MSI installer) The zip must end with win32-x86-no_ssl.msi.
Download the PHP zip package and PECL modules (PECL are extensions) Although extensions should come in the PHP package found in the extracted Ext folder) The PHP zip is under "Windows Binaries". Download the zip pack, not the installer.
Download MySQL Look for: "Windows Downloads": MySQL Windows x86. PHPmyAdmin Download PHPmyAdmin In case you are already running any flavor of PHP and MySQL start by stopping them.
----------------------------------------------
Installing 2 web server on local PC (apache and IIS)
Sometime we need 2 web server such as IIS and Apache on our PC, this is how to install apache and IIS on our PC
1. After installing IIS on your computer, reconfigure your port (on IIS services--> control panel) by click your right mouse --> properties --> port 8080
2. Test your http://localhost 8080:/ , if it work, then you may install the apache server.
3. Install your apache ( download here ), then start your apache.
4. Test you http://localhost/
4. Done..so now you may use that 2 web server savely.
Subscribe to:
Posts (Atom)